How to capture WiFi traffic using Wireshark on Windows
Table of Contents
Wireshark uses libpcap or Winpcap libraries to capture network traffic on Windows. Winpcap libraries are not intended to work with WiFi network cards, therefore they do not support WiFi network traffic capturing using Wireshark on Windows. Monitor mode for Windows using Wireshark is not supported by default.
Winpcap Capture Limitations and WiFi traffic on Wireshark
Capture is mostly limited by Winpcap and not by Wireshark. However, Wireshark includes Airpcap support, a special -and costly- set of WiFi hardware that supports WiFi traffic monitoring in monitor mode. In other words, it allows capturing WiFi network traffic in promiscuous mode on a WiFi network. However these cards have been discontinued and are deprecated, so they cannot capture traffic on networks running the latest WiFi standards (802.11ac).
Acrylic Wi-Fi Sniffer is an innovative alternative for capturing Wi-Fi traffic in monitor mode from Windows, including the latest 802.11ac standard.
Acrylic Wi-Fi Sniffer
Acrylic Wi-Fi Sniffer also enables Wi-Fi packet capture in monitor mode with Wireshark on Windows (in the latest versions Wireshark 3.0.0 or higher) and with other Acrylic Wi-Fi products such as Heatmaps or Analyzer. Because it has been designed as an economical and easily configurable alternative to AirPCAP hardware, it can capture all data available with this type of card, including SNR values, and is compatible with the latest 802.11ac standard in all channel widths (20, 40, 80 and 160 MHz).
If you want to know more about capture modes or discover the features that these two alternatives provide within Acrylic Wi-Fi products, please visit “Monitor mode and native capture mode in Acrylic Wi-Fi” article.
Acrylic Wi-Fi Sniffer and WiFi interfaces in Wireshark
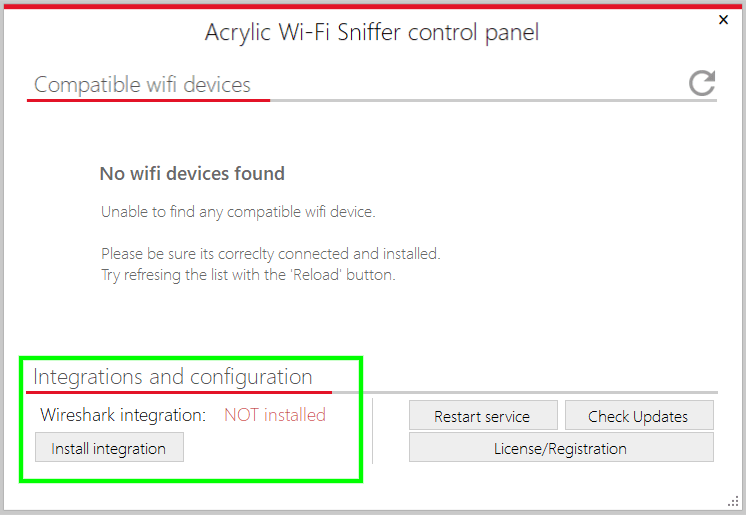
This integration is much easier than the previous one. Just install Acrylic Wi-Fi Sniffer and in the control panel of the sniffer click on the button “Install integration” as shown in the image below

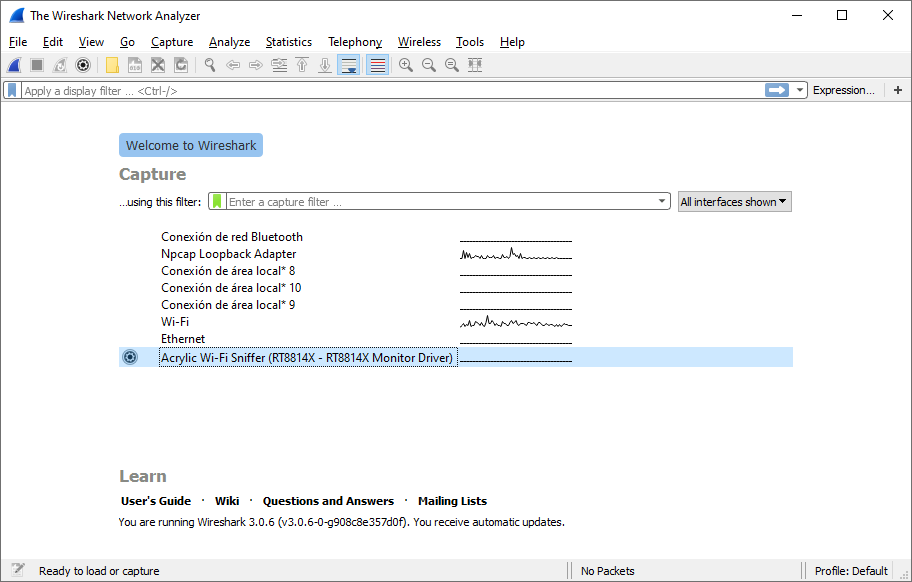
Once done, start Wireshark as administrator and all Acrylic Wi-Fi Sniffer available interfaces will be displayed.

Select an interface to use with Acrylic Wi-Fi Sniffer and click on the configuration wheel as seen in the previous screenshot and configure both channels and bandwidth where the capture will be carried out.
Once configured, we can start the capture in Wireshark and start receiving packets.
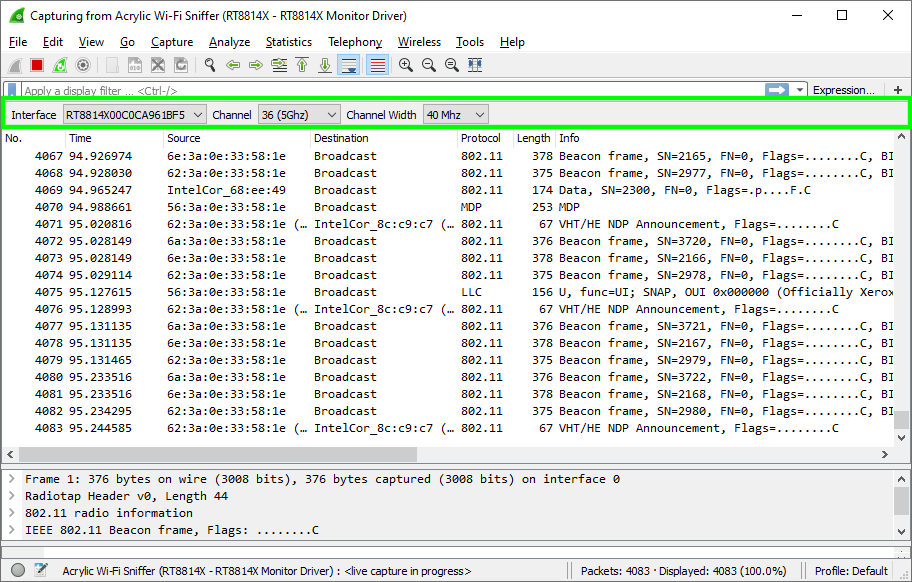
We have added a toolbar in WireShark that allows to quickly change the configuration on-the-go as shown in the image below

In order to activate it please go to “View” menu > “Interface toolbars” > “Acrylic Wi-Fi Sniffer interface integration”.
WiFi traffic capturing using Wireshark

In short, after installing Acrylic Wi-Fi Sniffer we start Wireshark as Administrator (right-click on Wireshark icon and select “Run as Administrator”) and select any Wi-Fi card that appears with the name NDIS network interface or Acrylic Wi-Fi Sniffer. In our case “Dell Wireless 1702/b/g/n WiFi Card” (integrated into Dell equipment) and the “RT8814X” (via Acrylic Wi-Fi Sniffer)
Video tutorial Acrylic Wi-Fi with Wireshark on Windows
You can download Acrylic Wi-Fi Sniffer which also allows integration with Wireshark during the evaluation period.
Capture WiFi traffic with Wireshark and Acrylic Wi-Fi Sniffer
Analyze WiFi packets with Wireshark in Windows with Acrylic Wi-Fi Sniffer
Buy SnifferWe appreciate your comments, please share this article on your social networks with the buttons below. Don’t forget to check our hardware compatibility list for better performance.
This article is part of a series of articles about how to capture and sniff wifi traffic on Windows
- WiFi Network Traffic Viewer
- How to capture WiFi traffic using Wireshark on Windows
- Hidden wifi ssid: How to know the name of a wireless network with no SSID
- Wifi Sniffer for Windows 10 on 802.11 networks
